Capture One 21 Upgrade Offer
Purchase Capture One 21 - Get Capture One 22 for free
It is true! Purchase Capture One 21 before Oct 4th midnight CEST and get the Capture One 22 upgrade for free when it arrives in December.
Purchase in the Capture One Store using my affiliate link.
Even better - save 10% by using discount code AMBROWE at checkout.
NOTE - This is the only promotion that will be offered to upgrade to Capture One 21 and get Capture One 22 for free. If you wait for other Capture One 22 promotions, the terms will differ and will not include access to Capture One 21.
Capture One 22 will include HDR Merge and Pano Stitching. You also will get all updates to Capture One 22. Capture One delivers lots of valuable additions in point releases throughout the year.
Read the full article to see all the great features included in Capture One 20 and 21 that you can access now, and get Capture One 22 with HDR Merge and Pano Stitching for free.
New Features In Capture One 20 and 21Here are many of the great features delivered in Capture One 20 and 21:
-
New Dehaze Tool
-
New Before/After Tool
-
Improved Brush Icons
-
Improved Lightroom Importer
-
Improved Importer w/ Viewer
-
Max Zoom increased from 400% to 1600%
-
Automatic Layer Selection on Brush Selection
-
Speed Edit Keyboard Shortcuts
-
Brush Adjustment Keyboard Shortcuts
-
Style Brush Layers
-
Magic Brush Layer Masking
-
Completely New Heal / Clone
-
Completely New Noise Reduction
-
Black / White Additions to HDR Tool
-
Improved Crop Tool Handles
-
Copy-Apply Individual Layers
-
Improved DNG Format Support
-
New Help Video Shorts
-
New ProStandard ICC Profiles
-
Native Apple M1 ARM Support
-
Support for Subfolders in Folders Tool
-
Ability to overwrite, skip, or add suffix for existing output files
-
Dozens of new camera and lens profiles
-
Lots of bug fixes and performance enhancements
A game-changing Speed Edit tool and the most authentic colors yet. Discover the new features that will transform the way you edit and create.
Speed EditRevolutionize how fast you edit photos. Speed Edit lets you work seamlessly without touching a slider on the interface – simply hold down selected hotkeys and scroll, drag or use the arrow keys to make rapid edits. You can even adjust multiple photos at once for the fastest ever batch edit.
DehazeEliminate haze and reduce flatness in your images – all in one slider. The powerful new Dehaze tool automatically adjusts contrast, saturation and other elements in flat photos.
Faster Asset ManagementGet seamless asset management. With increased power and speed, it’s now faster than ever to import, search and browse photos in Catalogs and Sessions.
Improved ImporterStart smooth and save disk space. High-resolution thumbnails make it easy to select images directly in the importer – and cull the ones you don’t want. Plus, import images from different folders at once.
Enhanced TooltipsNavigate the Capture One interface with ease – simply hover over a tool for a quick explanation of how it works and links for more learning. Enable or disable them from Preferences as you like.
LearnIt’s never been easier to master Capture One. With the new “Learn” button, quickly access a curated selection of tutorials designed to help you learn step-by-step.
HEIC supportWith support for HEIC files (8-bit), you can now edit photos from your Apple devices and more in Capture One.
New ProStandard ProfilesStay true to real life with the most authentic colors yet. These new camera profiles preserve original colors better than ever, protecting hues from changes caused by contrast. A game changer for portrait and product photography – and any image that relies on authentic color. Available for select camera models – see selected models here.
New Dehaze ToolUsers have asked for this for quite some time. Many of the competing photo editing tools offer this. The implementation in Capture One 21 is superior. Where photo editing tools simply provide a slider to adjust the strength, we get both positive and negative adjustment AND we get a color picker to direct the tool towards what color range we want to dehaze. This offers control beyond that provided in other tools, and if offers us some unique uses cases beyond removing haze in outdoor scenes. In this video I demonstrate how one can use the Dehaze tool to also add definition and sculpture the features of a face in portraits. Being able to select a specific skin tone with the color picker makes this a powerful new weapon in my arsenal for portrait retouching.
Speed Edit ShortcutsSpeed Edit gives you direct access to the most common adjustments without selecting and interact with the tools in the Adjustments tab. The new Speed Edit Keyboard Shortcuts intuitively map the adjustment sliders to the QWERTY keyboard. This enables you to select your desired adjustment slider with one hand and adjustment it with the other using one of these gestures: arrow keys, scroll wheel, or left-mouse-click-and-drag. The default keyboard shortcut mapping is what makes this very intuitive and easy to learn. The rows of mapped keys match the order of the tools in the Adjustments tab, and the key order on each row follows the order of the sliders they control.
- Numeric keys 1 and 2 control White Balance Kelvin and Tint
- Q, W, E, R keys control Exposure, Contrast, Brightness, Saturation
- A, S, D, F keys control HDR Highlight, Shadow, White, Black
- Z key controls Clarity
- X, C, V keys control Black, Midtones, White in the Levels tool
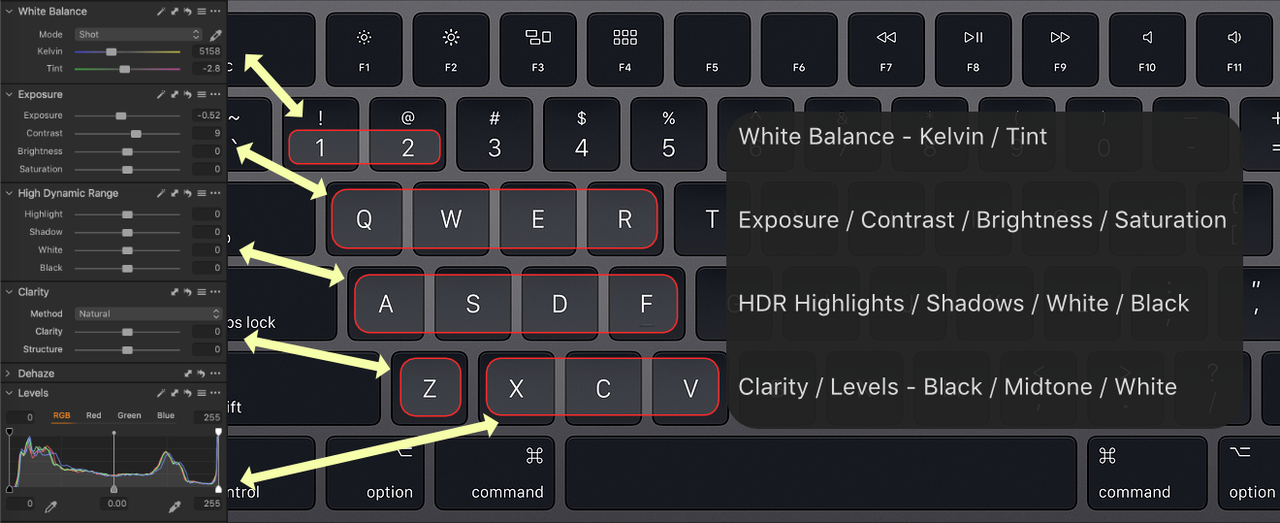
Simply press and hold the desired key with the left hand and make adjustments with the right. A small adjustment slider overlay appears at the bottom of the viewer as you make changes. This is indeed speed editing. If you have multiple images selected and displayed in the viewer, each image has the same delta applied relative to their current setting. If you increment exposure by 0.4, all images have exposure increased by 0.4. If you increase clarity by 20, all images have clarity increased by 20.
More Speed Edit adjustments are available in the Speed Edit Keyboard map including Dehaze, Structure, Vignette, Sharpening Amount, and Lens Correction Light Falloff, but these do not have keyboard shortcuts assigned in the default keyboard map. To assign shortcuts to these adjustments, go into Edit > Edit Keyboard Shortcuts..., create a new keyboard map, and assign them in your custom keyboard map. Custom keyboard maps are one of the many reasons I recommend Capture One to photographers.
Brush Adjustment ShortcutsContinuing with the trend of speeding up our editing we also get new shortcuts to all the brush adjustments. We already had shortcuts for selecting layer tools such as heal and clone brushes, gradients, and radial masks. Capture One 21 adds direct access to the brush settings themselves
- Adjust size, hardness with CTRL+OPT (macOS) or CTRL+ALT (Windows)
- Adjust flow, opacity with SHIFT+CTRL+OPT (macOS) / SHIFT+CTRL+ALT (Windows)
Press the desired keys + left-mouse-click. then drag the mouse left-right or up-down to adjust. A pop-up overlay shows all the brush settings and updates as you adjust.
Performance ImprovementsOn top of the features added to speed up editing we also get significant application speedup. Catalogs and Sessions open faster. Browsing large catalogs is faster. The import screen has larger, high resolution thumbnails. You can use highlight multiple images in the import browser and use the space bar to select or deselect them for import. The import process itself is significantly faster. Even even exporting a selection of images to a new catalog is significantly faster.
ConclusionCapture One 21 is laser focused on efficiency and saving time.
What's Related